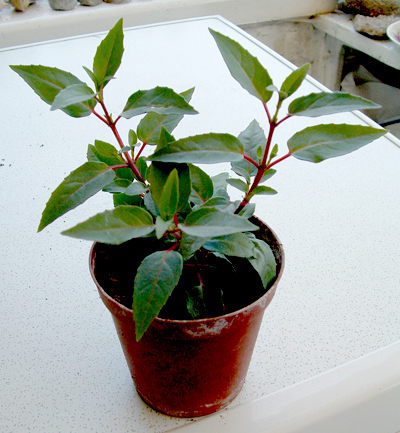
Softwood cuttings of Fuchsias
Late spring to early summer are the ideal times for increasing your stock of annuals, perennials. This is also a good way to save money, since you don't need to buy as many plants, because you're using annuals and perennials as 'stock plants' and propagating from them, rather than buying more than you might have done if you hadn't increased your stocks at home.
At this time of year the plants are growing vigorously and have a lot of young growth with a high capacity for making roots. Fuschias are very easy to propagate by this method, as are Pelargoniums, Heleniums and many herbs.
Softwood cuttings are not as easy to keep alive as some types of cuttings, because they lose water so quickly, but they have very good rooting potential and, with a little care, can be successful, satisfying and economical.
For this guide we'll look at Fuchsias (often misspelled as Fuschia).
As usual, there are rules for success:
1. Sharp, clean tools.
2. Clean pots.
3. Plant in good condition, free from pest and disease.
4. Plant is true to type - that is, cutting material should look like the cultivar it's supposed to be, as the cutting will be a clone of the parent plant.
Preparation and selection of cuttings
Before you take any cuttings, make sure that the plant has been well fed and watered beforehand so that it is in good condition, with the energy needed to make new roots.
When selecting the stems to cut from, look for soft growth and avoid stems with flower buds as these will use up the energy the stem needs to make roots. If all the stems have flower buds, carefully remove them, trying not to damage the stem tip as you do so. These stems may take longer to root than those that didn't have flower buds to start with, as they will contain less of the plant hormones (auxins) needed to make roots.
Take the cuttings early in the morning when the stems are still turgid (full of water). If you won't be using them till later in the day, or if the plants have been in dry soil, stand the stems in water for at least half an hour. Because this kind of plant material loses water so quickly, even taking the cuttings later in the day can mean that the plant is already experiencing water stress. If the material has wilted it will not be able to develop new roots.
Equipment you will need:
-
A sharp clean knife or scissors, clean pots, cuttings compost (equal parts of compost and sand, perlite or vermiculite, well mixed), an enclosed propagator or a clear plastic bag.
Method:
Choose a healthy plant with plenty of stems to cut from.
Remove a stem and cut back to two nodes (this is where leaves grow out and where roots can form), cutting just below a node.
If there are any flower buds, carefully remove them.
If the stem has large leaves, cut the two largest ones in half. This means the cutting will lose less moisture from its leaves, allowing it to put more energy into forming roots.

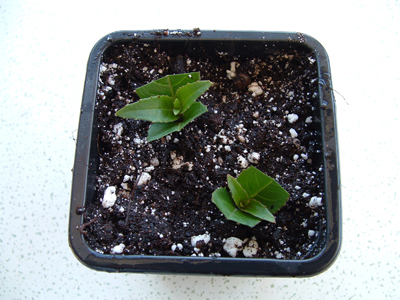
Fill a pot with the compost mix, tap it firmly three times on a flat surface to settle the mix, then water it and allow to drain.
You don't need to use rooting hormone as this may rot the stems.
Make a small hole with a dibber (pointy chopsticks are ideal for this) and push the cutting into the moist compost mix as far as it will go.
Firm round the base gently, using the dibber rather than your fingers, to ensure there are no gaps where a fungus can set in.
Continue to add the cuttings to the compost, making sure that the leaves of one are not touching the others.
Label the pot so you don't forget what it is and when the cutting was taken.
After care:
As the cuttings will continue to lose water through their leaves, ensure that they don't dry out, but be careful not to over water or they will rot. Keeping them in a ventilated propagator, or cold frame, with the bottom lined with damp sharp sand will help them to retain moisture.
If you don't have a propagator, put a clear plastic bag over the pot but remove it for a few minutes each day to ensure adequate ventilation.
Leave the cuttings in a light, warm situation, out of direct sunlight till rooted. Rooting generally takes around 3-4 weeks, so check the bottom of the pot to see if any are showing. When new roots do show, pot the cuttings on into their own pots. Continue to pot on as they grow and don't plant out until any frosts have passed and the plants are growing strongly.